|
|
|
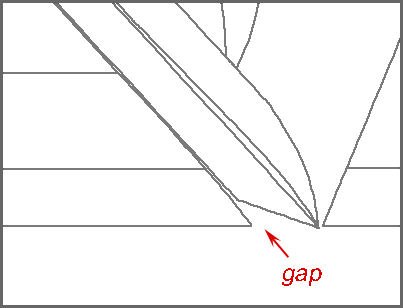
Mouth Dimension To achieve a consistent mouth dimension on a bevel-down plane, both surfaces of the blade need to be flat and parallel to each other, and the edge of the front part of the planes sole needs to be parallel to the blade bed. Chipbreaker Adjustment Setting the chipbreaker close enough to the blade edge for it to affect chip formation also involves careful tuning. If the screw is not perpendicular to the body of the chipbreaker, the blade will want to walk as the screw is tightened. One side of the screw will touch the blade first, putting pressure on it that will cause it to move relative to the chipbreaker. Correcting this problem is difficult, and my solution has been to make my own chipbreakers. Final adjustment includes removing steel from the underside of the chipbreaker body until both sides of the screw begin to touch the blade at the same time during tightening. Ive developed a chipbreaker design that has only a little arc in the body of the chipbreaker. Because of this, it almost touches the blade even when the screw is loose and tends to stay in place as the screw is tightened. See the section below for details of this design. Lapping the Sole I use a 220 grit waterstone to start with, followed by an 800 grit stone. Before I start, I oil the inside surfaces of the throat to help prevent rust. Whenever I stop, even for a minute, I clean off all of the slurry and dry the plane carefully, especially inside the throat. The final lapping is done with a blade clamped in the plane, slightly retracted. I prefer waterstones to sandpaper because I dont want the leading edge of the mouth to be dubbed (slightly rounded). All of my attempts to lap with sandpaper have left the edges dubbed. Checking the Blade Bed Since infill planes dont have a frog that can be removed from the plane body, checking the bed for flatness is difficult. I lap the bevel side of the blade and put it in the plane, then use feeler gauges to see if there is any gap under the blade at the back of the bevel. Here is a diagram of a poorly bedded blade:
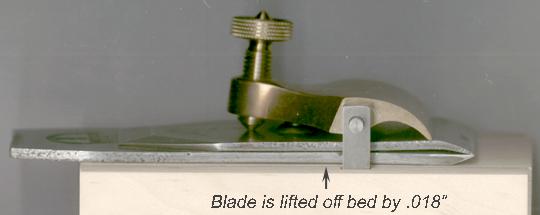
If the back of the bevel rests solidly on the bed when the lever cap is tightened moderately, I consider it good enough unless the plane has performance problems. One of my planes had a tendency to skip over certain patches of the workpiece when I was taking a very thin shaving. To check the bedding of the blade, I put a black coating on the surface of the blade that rests on the blade bed. When the blade was clamped in the plane body and tapped a little for adjustment, the coating from the middle of the blade was rubbed off onto the blade bed, but the coating at the sides of the blade and (more important) at the back of the bevel remained on the blade. This told me the blade bed was slightly higher in the middle than at the edges, so that the blade could flex or spring back depending on the amount of pressure being applied to it by the cutting force at the blade edge. Im still working out good ways to remove the high spot on the blade bed, and need to modify some chisels to be able to remove wood in a controlled way. For my first bed flattening attempt I used soot from a candle to coat the blade but I now prefer to use a black marker. This eliminates any chance of changing the temper of the steel in the blade. My Chipbreaker Design The original chipbreakers all seem to lift the middle of the blade off the bed of the plane even when the lever cap is tightened. There is so much arc to the chipbreaker that tightening the screw bows the blade considerably. This is a test jig I made to allow me to check the effect of a chipbreaker on the bedding of a blade:
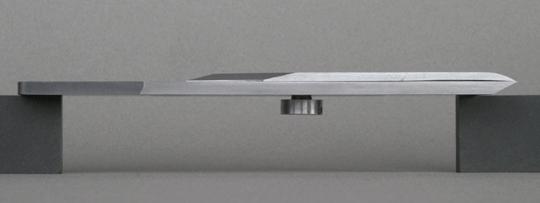
I doubt the bow in the blade is necessary for peak performance of the plane. Instead, it is insurance that the blade will be bedded properly at the back of the bevel even if the bed and the blade do not mate well. I know from experience that lapping the bevel side of the blade and flattening the blade bed take considerable time and effort. This can be avoided by having the chipbreaker lift the blade in the middle, but at the cost of increased tendency of the blade to chatter. I have been making my own chipbreakers to see if I can get the blade to lie flat on the bed. Mine have very little arc. Here are side views of one with the screw loose:
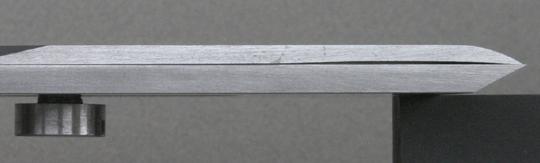
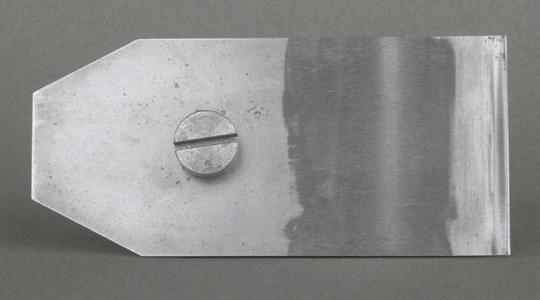
The lower surface of the chipbreaker is lapped flat at the top, it is relieved slightly from below the screw hole to the tip, and the tip curls down to about .008 below the plane of the lapped area. Heres what the underside looks like:
This shape keeps the chipbreaker tight against the blade to prevent shavings from getting caught, but barely bows the blade at all. When the lever cap is tightened, the blade lies flat on the entire bed. The most noticeable effect of this is to make tightening the lever cap more positive. There is no sponginess, and the pressure increases quickly just as the right amount of tightness is reached. The blade doesnt deform so the set of the blade is only slightly affected by lever cap pressure. This makes it easier to adjust the blade using the tap and try method since setting the pressure on the lever cap is more predictable.
|
|
[Home] [Summary of Results] [Testing Procedure] [Chipbreaking] [Cutting Angles] [Shaving Formation] [Tuning Infill Planes] [Links & References] [Contact] [Site Map] |