|
|
|
Surface quality for different wood plane settings Kees van der Heiden. The Netherlands. 2014. When using a hand plane for woodworking, a difficult problem is tearout when planing against the grain. Typical measures against tearout are the use of a very sharp blade, careful stock selection and thin shavings. But that doesnít always help in all types of wood. To improve the performance of the plane, the user can choose three different methods. A very tight mouth, a higher cutting angle or a capiron set very close to the edge of the plane (Holtzapffel, 1856). Extensive research to the effect of capirons has been done in Japan (Kato, 1989) To compare the capiron effects with the other two methods this experiment has been designed. It gives an idea which cutting angle compares in function to which capiron setting and how well a tight mouth prevents tearout.
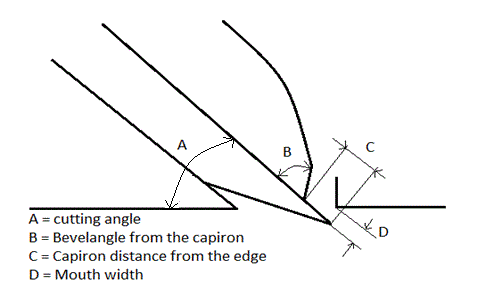
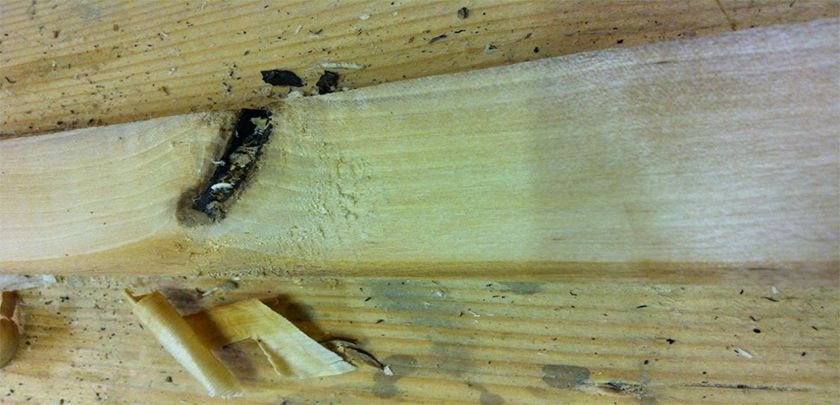
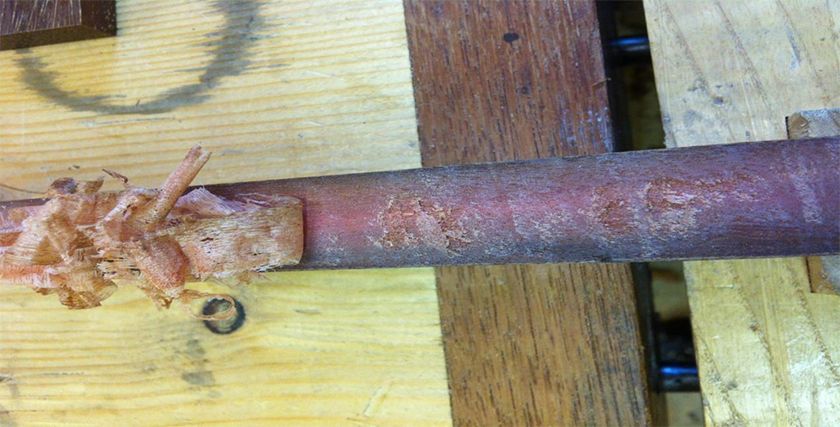
Figure 1 Hand plane mouth dimensions I would like to express my thanks to Bill Tindall, Steve Elliott and Mark Hennebury for their friendly help, encouragement and critical comments. Although they live on another side of the world, their help was invaluable for the results of this report. Test setup. A Stanley #4 plane with a 3mm thick Ray Iles high carbon cutting blade and the standard Stanley capiron was used. The Ray Iles cutting blade is thicker than the original blade and gives the plane a more solid feel. The frog is pulled back, so the iron beds fully on the frog and the sole. The leading edge of the capiron is grinded to 43 degrees and polished. The cutting blade is grinded at 25 degrees, with a micro bevel added at 30 degrees on a Naniwa SS 8000 polishing stone. The edge was freshly sharpened for each test setup. The plane has a bedding angle, thus also a cutting angle, of 45 degrees. Extra experiments were with the capiron set close to the edge in combination with a higher cutting angle. An Ulmia plane with 49 degree bedding angle was used for this test. The leading edge of the capiron from this plane is 40 degrees. The last test was with a variable mouth size using the Stanley plane again with 45 degree cutting angle and the capiron pulled back to 1 mm from the edge. The wood specimens are a length of European soft maple (Acer pseudoplatanus), a piece of lignum vitae and some curly walnut (Juglans regia). The maple board has a large knot in the middle, with rowdy grain around it. When planing as much as possible against the grain, this piece of wood is susceptible to tearout. The lignum vitae has undulating grain and was also cut at an angle around 8 degrees to the main grain direction. Planing is done against the grain in this board too. Finally the walnut has curly grain. This means that every few cmís the grain direction reverses.
Figure 2 Tearout visible on the right side of the knot.
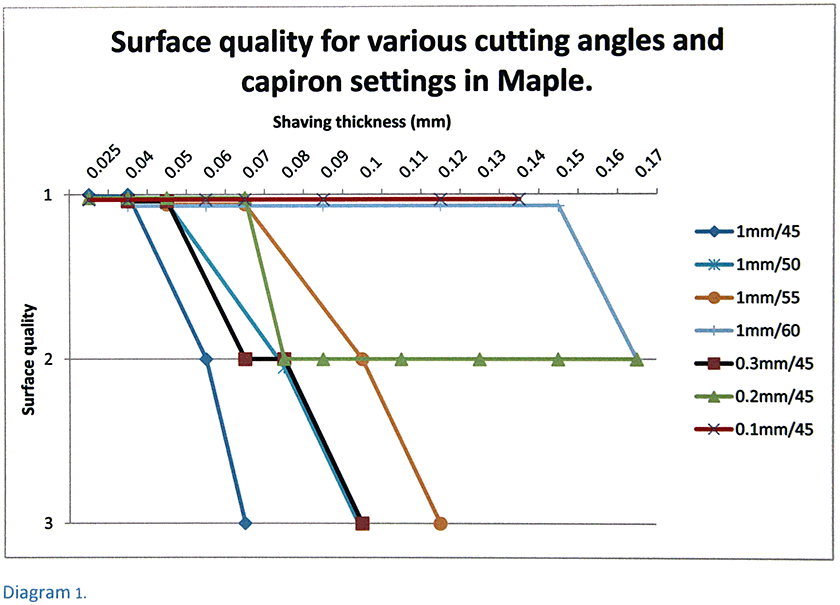
Figure 3 Lignum vitae with deep tearout while taking a light shaving The settings of the capiron close to the edge was measured with a microscope. Higher cutting angles were simulated with a back bevel on the face side of the cutting blade. For example a 10 degree back bevel gives a cutting angle of 45 plus 10 is 55 degrees. The back bevel was made on a 1000 grit sharpening stone, about 0.5 mm wide and polished with the Naniwa 8000 polishing stone. Each setting of capiron and cutting angle was tested on the wood specimens. The depth setting of the plane was gradually increased to determine when tearout starts to happen. Each depth setting was tested for several planing strokes to get a thorough impression of the resulting wood surface quality. The quality was scored on a scale of 1 to 3: smooth, rough feeling spots and real tearout. Shaving thickness was measured before and after the most obvious tearout spot in a smooth part of the shaving. The tearout spot itself causes a very wrinkly shaving, which is hard to measure. A micrometer caliper, accurate to 0.01 mm, was used. During these tests the mouth of the plane was wide open. The same kind of test was done on the maple board and the walnut to test the capiron settings at a higher cutting angle. The last test was with various tight mouth settings at a 45 degree cutting angle and with the capiron far from the edge. Results The results of the test on the maple board are presented in diagram 1.
There are four settings at a cutting angle of 45 degrees. A capiron setting at 1 mm, which is too far from the edge to be effective, 0.3, 0.2 and 0.1 mm. Then the capiron was set at 1 mm again and cutting angles at 50, 55 and 60 degrees were tested. The surface quality with the 1 mm / 45 degree setting degraded quickly when the shaving thickness increased. The setting of 0.3 mm / 45 degrees gave tearout at 0.09 mm shaving thickness, so isnít yet optimal either. The 0.2 mm / 45 degree setting is better with rough feeling spot at 0.07 mm, but the surface didnít degrade further with thicker shavings. The setting 0.1 mm from the edge provided a smooth surface until no thicker shavings could be produced. The capiron worked like a depth limiter in this setup. The 1 mm / 60 degree setting gave a smooth surface until very thick shavings of 0.15 mm were produced. This marked almost the end of the usable shaving thickness for this plane in this wood. The 60 degree cutting angle made the plane very hard to push and chatter sets in around these values.
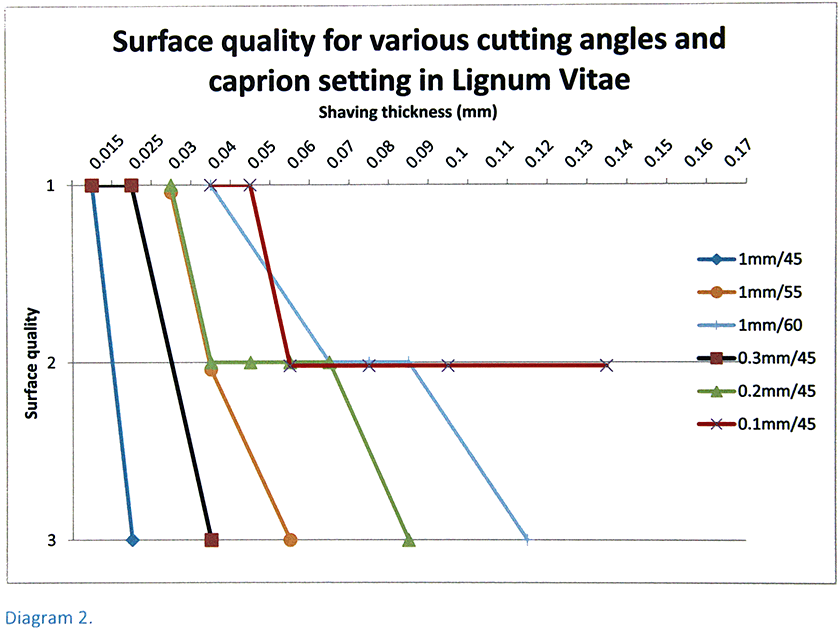
The results of the test on the lignum vitae board is presented in diagram 2.
The Lignum Vitae board was more challenging to plane against the grain. The first test with the capiron at 1mm and 45 degree cutting angle resulted in deep tearout even with a very light shaving of 0.025 mm. The 50 degree cutting angle test was skipped, because it was just as bad. The 55 degree cutting angle was not much better, resulting in very deep tearout at 0.05 mm. The tests with the capiron set close to the edge were better. The capiron set 0.3mm from the edge was again not good enough. The capiron at 0.2 mm from the edge performed better but not good enough. At 0.1 mm it was possible to create a smooth surface up to 0.05 mm and the surface didnít deteriorate much with thicker shavings. The test with the 60 degree angle was very much like the test with the capiron at 0.1 mm.
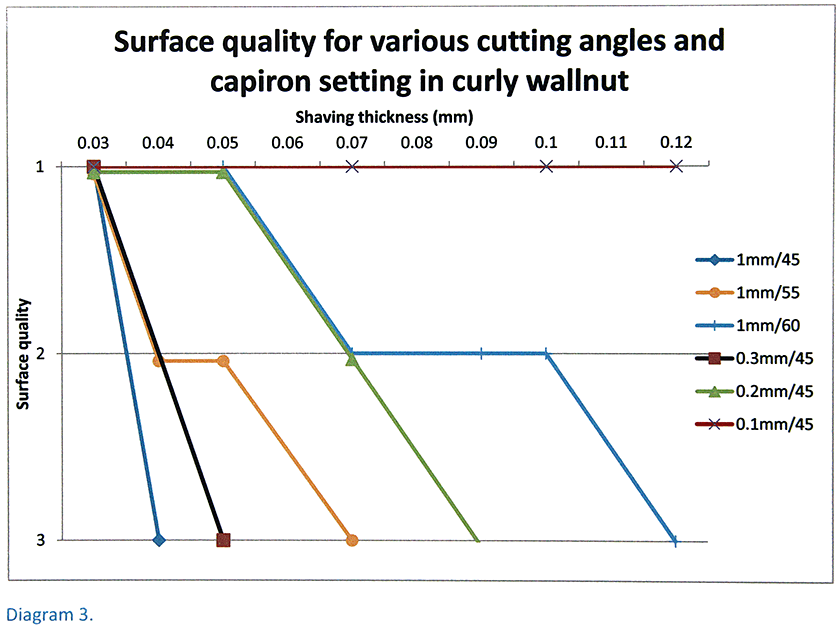
The result of the test on the walnut board is in diagram 3.
The walnut proved to be a challenge to plane too. Especially the higher cutting angles struggled with this board. First it was 4 cm wide and both the 55 and 60 degree cutting angle produced chatter marks. The Stanley plane is clearly not strong enough to support these forces. The high cutting angle tests also didnít reach the same values as in the maple and lignum vitae boards, relative to the capiron settings of 0.2 and 0.1mm. To eliminate the chatter marks, the board was ripped in half to a narrower wide of 1.5 cm. This eliminated the chattering, but didnít improve the tearout test results. A 60 degree cutting angle is just a little better than the 0.2 mm capiron setting. Similarly the 55 degree cutting angle was just a little better than the 0.3 mm capiron setting.
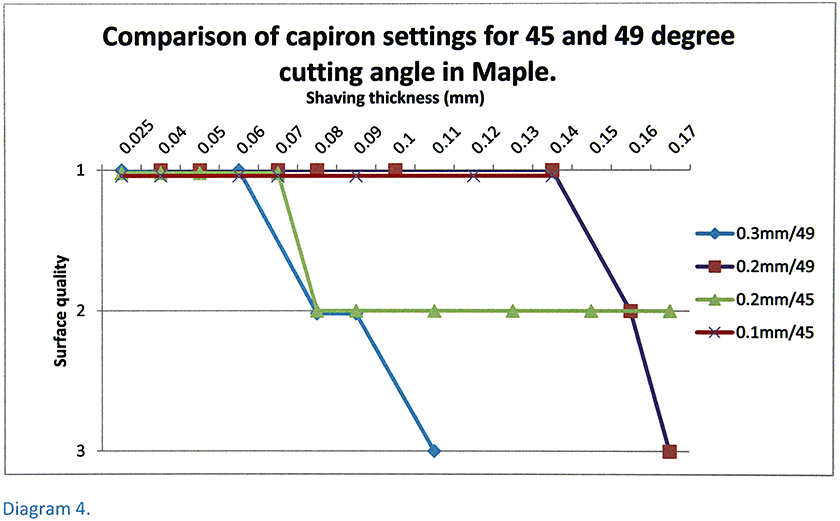
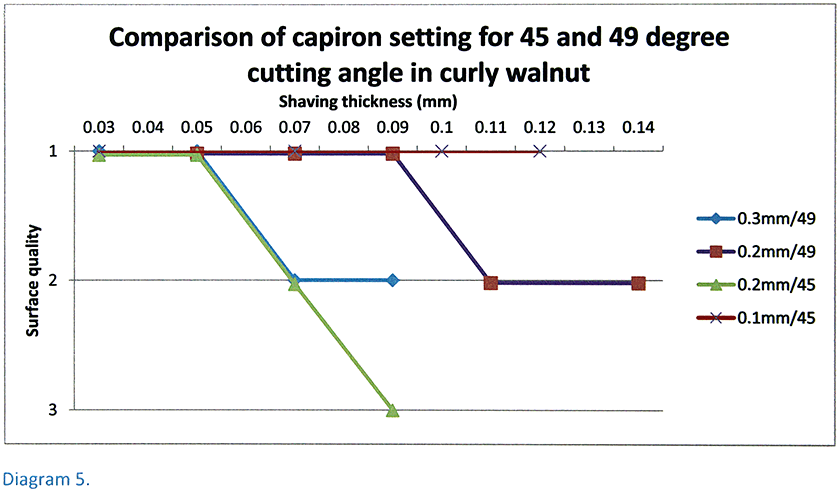
The results of the test with a combination of higher cutting angle and closely set capiron are in diagram 4 and 5.
. Two capiron settings were tested in the Ulmia plane, which has a cutting angle of 49 degrees. For comparison the values of comparable settings in the 45 degree plane are added to the diagram.
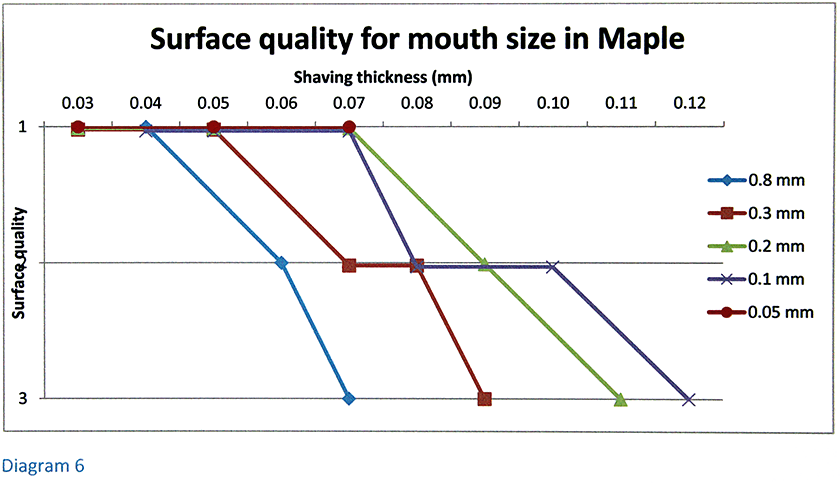
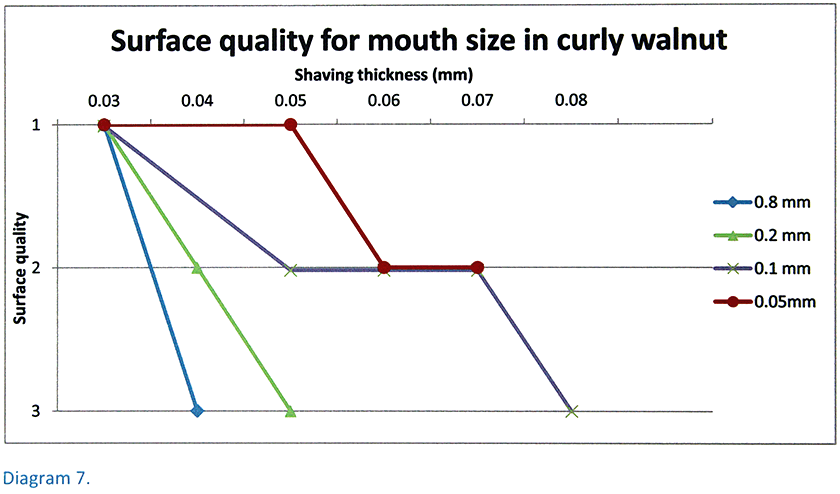
Testing results of the mouth size test are in diagram 6 and 7.
The Stanley plane has an adjustable frog. After careful filing of the front edge of the mouth to make it straight and square, it is now possible to set the mouth size to a very fine setting. The sole was checked and corrected, so the area just in front of the mouth is absolutely coplanar with the front and the back of the plane sole. For comparison the results for a fully open mouth, 0.8 mm wide, from the previous tests is added to these diagrams. As can be seen, the results are not as good as with the higher cutting angle and capiron effect tests. The finest mouth of 0.05 mm limits the shaving thickness of course. A 0.07 mm thick shaving could barely squeeze through, being so tight that the plane could be lifted up on the shaving. The sole of the plane should have three points in contact with the wood, A line at the front, just before the mouth and at the back. The first tests with a tight mouth were very disappointing. A smooth surface on the maple board with more than an 0.05 mm thick shaving was not possible. On close inspection a gap between a straight edge and the plane sole just in front of the mouth was found of 0.015 mm. This is normal wear of the sole and a similar gap was also found in other planes, even new ones. Nonetheless it is detrimental for the function of the mouth to reduce tearout. Conclusions The absolute values of these experiments are not very interesting. The different values for the three very different kinds of wood demonstrate this clearly. But despite these differences, certain trends are obvious. On this board of maple and with this Stanley plane, a capiron setting at 0.2 mm from the edge can be compared to a cutting angle of 55 degrees. A capiron setting of 0.1 mm from the edge can be compared to a 60 degree cutting angle. The test with the Lignum Vitae board confirms this conclusion. Although planing this wood against the grain is much more difficult and the surface wasnít absolutely pristine throughout the test, the 60 degree cutting angle test performed very much like the 0.1 mm capiron test, not just in the test results, but also in the subjective feel during the test. The walnut test had slightly different results. Here the high cutting angles didnít reach the same values as in the previous tests. Thus the overall conclusion is that a 60 degree cutting angle compares to a capiron setting between 0.2 and 0.1 mm. And a 55 degree cutting angle compares to a capiron setting between 0.3 and 0.2 mm. The results from the capiron settings in the maple board closely resemble the findings from Kato (1989). With a shaving thickness of 0.1 mm and a 50 degree bevel on the capiron he had the same result, planing Japanese Magnolia against the grain. Another conclusion possible from this experiment is the ability of the capiron to control tearout damage. When the capiron is close to the edge, but not close enough to completely prevent tearout, it at least limits the amount and depth of tearout. The 45, 50 and 55 degree cutting angles behaved much more like a binary setting. Either the plane produced a smooth surface, or with just a little thicker shaving, the wood tears out in a major way. The effect of the capiron can be increased when the bedding angle is higher. In the Ulmia plane, a capiron set at 0.2 mm from the edge had the same effect as a 0.1 mm setting in the Stanley plane. Remarkable is that both planes present the same perpendicular wall to the shaving. The Ulmia plane has a capiron with a 40 degree bevel, the Stanley plane has 43 degrees. The total included angle is 89 and 88 degrees respectively (A + B in figure 1). This means that the better performance of the Ulmia plane is due to the higher cutting angle only. Reducing the mouth size has only a limited effect on the surface quality with increasing shaving thickness. A 0.05 mm wide mouth is very tight indeed and usually only available in specially prepared planes. Using shaving thickness to distinguish between the various setups is a valid choice. One could argue that nobody will smooth a maple board with a 0.17 mm thick shaving, but it should be remembered that these tests were done with a freshly sharpened blade. The extra possible shaving thickness means a valuable buffer when the edge dulls. The difference between the maple, the lignum vitae and the walnut tests show how increasing difficulties quickly reduce the achievable shaving thickness. Literature Holtzapffel, C. (1856). Turning and Mechanical Manipulation, Vol. II. London, UK. Kato, C. (1989). Effect of knife chipbreakers on surface finish. Yamagata, Japan. |
|
The original of this study is available in the PDF file linked here. |
|
[Home] [Summary of Results] [Testing Procedure] [Chipbreaking] [Chipbreaker Tests] [Chipbreaker Study] [A Controlled Test] [Review of Cap Iron Study] [Cap Iron Study by Kees van der Heiden] [Mechanics of Chipbreakers] [Cutting Angles] [Shaving Formation] [Tuning Infill Planes] [Links & References] [Contact] [Site Map] |
