|
|
|
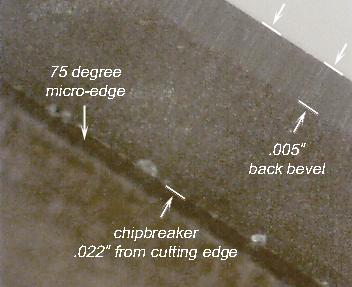
To determine whether a chipbreaker can reduce tear-out, I needed to do a controlled test in which only the chipbreaker distance was changed. If a larger chipbreaker distance resulted in tear-out and a smaller distance reduced or eliminated it, that would resolve the issue. My first attempt to decide this was successful. I planed the edge of a piece of Bolivian rosewood with a chipbreaker setting between 1/64 and 1/32 as shown below.
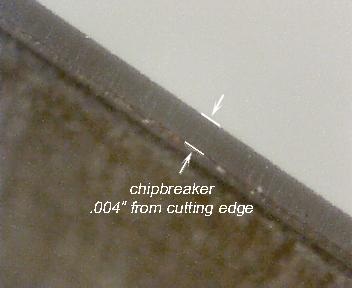
Even with a freshly honed blade taking shavings about .001 thick, serious tear-out was evident on the ribbons of wood where the grain direction was adverse. The mouth dimension of the plane for both parts of this test was about .025 or slightly less than 1/32 of an inch. After planing the entire edge with this chipbreaker setting, I touched up the blade and set the chipbreaker .004 from the edge. Heres an image of that setting:
To allow better comparison of the two surfaces, I left one end of the board as it was and planed the other end, attempting to remove the tear-out. The results were immediately apparent, and I continued planing until the new surface no longer continued to improve. There was still tear-out, but it was not nearly as deep and was confined to fewer areas. The improvement in the quality of the surface produced was unmistakable. For a benchmark, I had first planed the other edge of the rosewood using a 12º back bevel, which had given me the previous best surface on this difficult timber. That surface was still considerably better than the one produced using a chipbreaker distance of .004 inches. It had only one patch of minor tear-out, otherwise just dullness in the areas of adverse grain.
A Few More of the Specifics:
Summary of Procedure:
|
|
[Home] [Summary of Results] [Testing Procedure] [Chipbreaking] [Chipbreaker Tests] [Chipbreaker Study] [A Controlled Test] [Review of Cap Iron Study] [Cap Iron Study by Kees van der Heiden] [Mechanics of Chipbreakers] [Cutting Angles] [Shaving Formation] [Tuning Infill Planes] [Links & References] [Contact] [Site Map] |